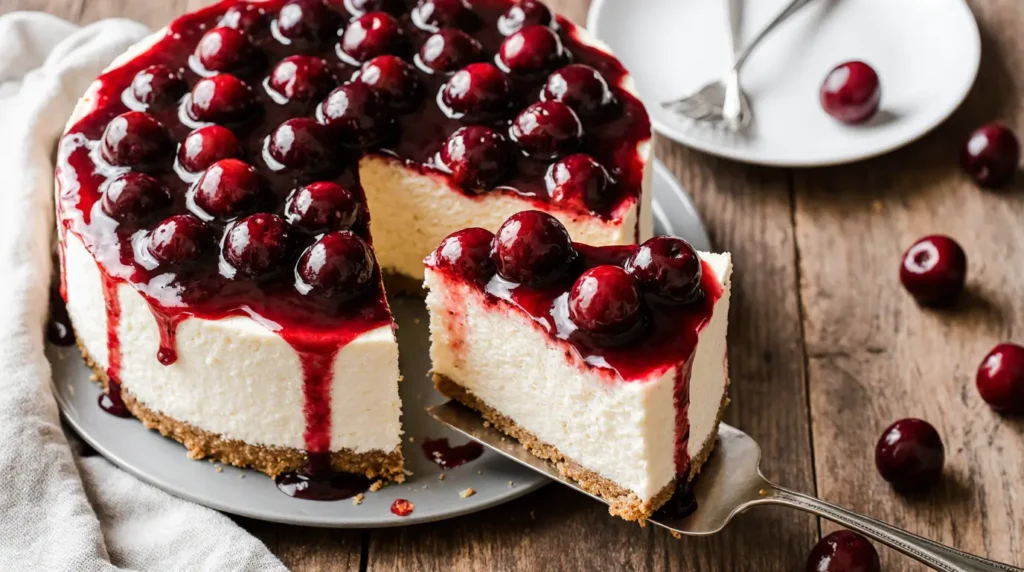
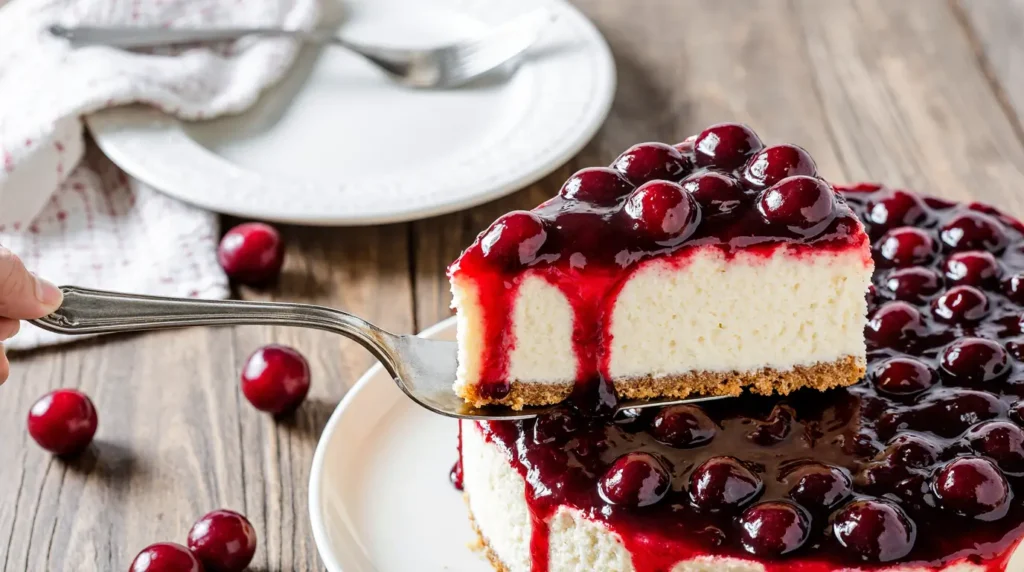
Cherry Cheesecake Recipe
Tired of cracked cheesecakes that sink in the middle or turn out grainy and dense? You’re not alone. Traditional cherry cheesecake recipes often leave home bakers frustrated with inconsistent results, despite following instructions to the letter. But what if I told you there are three game-changing methods that professional pastry chefs use to create flawless, creamy cheesecakes every single time?
The Art of Perfection Begins With Understanding Your Tools
Table of Contents
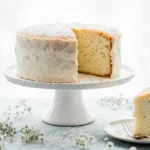
This cherry cheesecake recipe delivers a velvety-smooth texture with a perfectly golden crust and a luscious cherry topping that balances sweet and tart in every bite. After 15 years as a pastry chef specializing in classic American desserts, I’ve refined these techniques to guarantee success whether you’re a complete beginner or an experienced baker looking to elevate your skills.
This cherry cheesecake recipe is a game changer. The cherry cheesecake recipe ensures a smooth, creamy texture every time.
In this ultimate cherry cheesecake recipe, you’ll learn how to achieve that desired creamy consistency that everyone loves.
Perfect your cherry cheesecake recipe by following these essential tips.
Each section covers important tips related to the cherry cheesecake recipe and how to perfect it.
In this guide, you’ll discover the science behind perfect cheesecake texture, learn how to choose the right ingredients for maximum flavor, master three revolutionary cooking methods (including a no-bake option), and get insider tips for avoiding common pitfalls. Plus, I’ll share flavor variations, storage hacks, and answers to your most pressing cheesecake questions.
Recipe Overview
This section highlights why this cherry cheesecake recipe consistently delivers delicious results.
| Attribute | Details |
|---|---|
| Prep Time | 25 minutes |
| Cook Time | 60-75 minutes (varies by method) |
| Cooling Time | 4-6 hours |
| Total Time | 5-7 hours |
| Servings | 12 slices |
| Course | Dessert |
| Cuisine | American |
| Oven Temperature | 325°F (163°C) for Method 1, 475°F then 200°F for Method 2 |
| Calories | 385 per slice |
With this cherry cheesecake recipe, you simplify dessert preparation while impressing your guests.
Why This Cherry Cheesecake Recipe Works
Every Great Recipe Has a Foundation Built on Simplicity
This cherry cheesecake recipe succeeds where others fail because it combines foolproof techniques with accessible ingredients:
- Uses standard supermarket ingredients – No specialty items or hard-to-find imports required
- Three flexible methods – Choose water bath, New York-style, or no-bake based on your comfort level
- Fail-safe temperature control – Prevents the dreaded cracks and ensures creamy texture
- Make-ahead friendly – Perfect for entertaining since it requires overnight chilling anyway
- Customizable cherry topping – Works with fresh, frozen, or canned cherries year-round
- Feeds a crowd – One 9-inch cheesecake serves 12 generous portions
Choosing the Right Ingredients
Quality Ingredients Transform Good Recipes Into Memorable Experiences
Utilize variations on the classic cherry cheesecake recipe to suit any occasion.
The cherry cheesecake recipe can be made ahead of time for convenience.
Best Cream Cheese for Cheesecake
The foundation of any great cheesecake starts with premium cream cheese. Use full-fat cream cheese (not reduced-fat or whipped varieties) at room temperature. Philadelphia brand is the gold standard, but store brands work well too. Room temperature is crucial – cold cream cheese creates lumps that won’t smooth out, no matter how long you mix.
Buying Tips:
Choosing the best cream cheese is essential for your cherry cheesecake recipe.
- Look for cream cheese blocks with the latest expiration date for maximum freshness
- Buy an extra block as backup – you’ll need exactly 32 ounces (four 8-oz packages)
- Avoid spreadable cream cheese in tubs – it contains stabilizers that affect texture
- Set cream cheese out 2-3 hours before baking, or microwave in 10-second bursts
Substitutions:
- Can’t find cherry pie filling? Use fresh cherries simmered with sugar and cornstarch
- Out of sour cream? Greek yogurt works in equal amounts
- No graham crackers? Swap with vanilla wafer cookies or digestive biscuits
- Prefer less sugar? Reduce to 1 cup, but don’t go below ¾ cup or texture suffers
Ingredients & Prep
Ingredient List
| Ingredient | Quantity |
|---|---|
| Graham cracker crumbs | 2 cups (about 16 crackers) |
| Unsalted butter, melted | ½ cup (1 stick) |
| Granulated sugar (for crust) | ¼ cup |
| Cream cheese, room temperature | 32 oz (4 packages) |
| Granulated sugar (for filling) | 1¼ cups |
| All-purpose flour | 3 tablespoons |
| Fine salt | ¼ teaspoon |
| Large eggs, room temperature | 4 whole |
| Egg yolks, room temperature | 2 additional |
| Sour cream | ⅔ cup |
| Heavy cream | ⅓ cup |
| Vanilla extract | 2 teaspoons |
| Lemon zest | 1 teaspoon (optional) |
| Cherry pie filling | 21 oz can (or homemade) |
| Fresh lemon juice | 1 tablespoon (for topping) |
Cheesecake Prep Essentials
Crust Preparation: Start by creating uniform graham cracker crumbs – use a food processor for 30 seconds, or place crackers in a sealed bag and crush with a rolling pin. Mix crumbs with melted butter and sugar until the mixture resembles wet sand. Press firmly into the bottom and 1 inch up the sides of a 9-inch springform pan using the bottom of a measuring cup for even compaction.
Cream Cheese Technique: This step makes or breaks your cheesecake. Beat room-temperature cream cheese alone for 3-4 minutes on medium speed until completely smooth and fluffy with no lumps visible. Scrape down the bowl frequently. Add sugar and beat another 2 minutes. This creates the signature creamy base that prevents graininess.
Egg Integration: Add eggs one at a time on low speed, mixing just until the yellow disappears after each addition. Overmixing at this stage incorporates too much air, which leads to cracks. Finish by gently folding in sour cream, heavy cream, and vanilla with a spatula.
Pantry Staples Breakdown
Why These Ingredients Matter:
- Flour – Stabilizes the filling and prevents excess jiggling
- Sour cream – Adds tangy flavor and contributes to smooth texture
- Heavy cream – Creates richness without heaviness
- Lemon zest – Brightens the flavor and cuts through sweetness
- Salt – Enhances all other flavors and balances sugar
Step-by-Step Cooking Instructions
Instructions Table
| Step | Time/Temp | Key Point |
|---|---|---|
| Prepare crust | 10 min @ 350°F | Press firmly, pre-bake until golden |
| Make filling | 15 minutes | Beat cream cheese until smooth first |
| Pour and smooth | 2 minutes | Tap pan to release air bubbles |
| Bake (Method 1) | 60-70 min @ 325°F | Water bath prevents cracks |
| Cool gradually | 1 hour in oven | Door ajar prevents temperature shock |
| Chill completely | 4-6 hours | Mandatory for proper setting |
| Add topping | 5 minutes | Just before serving for best appearance |
Method 1: Water Bath Technique (Most Foolproof)
Pre-Cooking Prep: Wrap the outside of your springform pan with two layers of heavy-duty aluminum foil, covering the bottom and extending up the sides. This prevents water from seeping in. Preheat oven to 325°F. Place a large roasting pan on the middle rack.
Cooking Method: Pour the cheesecake filling over the pre-baked crust. Smooth the top with an offset spatula. Place the springform pan inside the roasting pan and carefully pour hot water into the roasting pan until it reaches halfway up the sides of the springform pan. Bake for 60-70 minutes until the edges are set but the center still jiggles slightly (like Jell-O).
A flawless cherry cheesecake recipe requires attention to detail in every step.
Doneness Check: The cheesecake is ready when the outer 3 inches are firm but the center 2-3 inch circle still wobbles gently when you shake the pan. Internal temperature should reach 150°F in the center. Do not wait for the entire surface to be completely set – it will continue cooking as it cools.
Mastering the cherry cheesecake recipe will make you a confident baker.
Resting: Turn off the oven and crack the door open about 4 inches. Let the cheesecake cool in the oven for 1 hour. This gradual temperature change prevents the dreaded surface cracks. Then remove from oven, take off foil, and cool completely at room temperature before refrigerating.
Follow this cherry cheesecake recipe step-by-step to ensure success.
Method 2: New York-Style High-Heat Method
Pre-Cooking Prep: No water bath needed for this method. Preheat oven to 475°F – yes, that’s correct! This high initial temperature creates the characteristic dense, creamy New York texture.
Cooking Method: Pour filling over pre-baked crust. Bake at 475°F for exactly 15 minutes. Without opening the oven door, reduce temperature to 200°F and bake for an additional 60 minutes. The high heat sets the exterior quickly, while the long low-temperature bake cooks the center gently.
Doneness Check: Same wobble test as Method 1 – set edges, jiggly center. This method typically produces a slightly browned top, which is traditional for New York-style cheesecake.
Resting: Turn off oven, crack door, and cool for 1 hour in the oven as described above.
Method 3: No-Bake Revolutionary Technique
Pre-Cooking Prep: Use the same crust as above, but bake it for 12 minutes and let it cool completely. Chill in the refrigerator while making the filling.
No-Bake Filling Method: Beat cream cheese as directed, but replace heavy cream with additional sour cream (1 cup total sour cream). Dissolve 2 teaspoons unflavored gelatin in 3 tablespoons cold water, then heat gently until liquid. Beat gelatin mixture into the cheesecake filling on low speed. Pour over chilled crust.
Setting Time: Refrigerate for at least 6 hours or overnight. The gelatin firms the filling without baking, creating a lighter, mousse-like texture that’s perfect for hot summer days or when you don’t want to use the oven.
Pro Tips for Perfect Cherry Cheesecake
Avoiding Cracks and Dense Texture
Preventing Cracks: Cracks happen from temperature shock or overbaking. Always use room-temperature ingredients so they blend smoothly without extended mixing. Don’t open the oven door during baking – sudden temperature drops cause the surface to contract and crack. The water bath method is your insurance policy against cracks because the steam keeps the oven environment humid and gentle.
Achieving Creamy Texture: The secret is minimal mixing after adding eggs. Mix each egg on low speed for only 10-15 seconds. Overmixing incorporates air bubbles that expand during baking and deflate during cooling, creating a dense, heavy texture. Think of eggs as the setting agent, not something to be whipped.
Tool Recommendations
This cherry cheesecake recipe can be adapted for various dietary preferences.
Essential Equipment:
- 9-inch springform pan – Non-negotiable for easy release and clean slices
- Electric mixer – Stand mixer is ideal, but hand mixer works with patience
- Instant-read thermometer – Takes the guesswork out of doneness
- Offset spatula – Creates a smooth top and helps with serving
- Heavy-duty aluminum foil – Prevents water leaks in the water bath method
Nice to Have:
- Food processor for crust crumbs
- Fine mesh strainer for super-smooth filling
- Cake lifter for easy plating
Storage & Reheating
| Storage Method | Duration | Instructions |
|---|---|---|
| Refrigerator (whole) | 5-7 days | Cover tightly with plastic wrap, keep away from strong odors |
| Refrigerator (sliced) | 3-4 days | Wrap individual slices in plastic, store in airtight container |
| Freezer (whole, no topping) | 2-3 months | Wrap in plastic, then foil, thaw overnight in fridge |
| Freezer (sliced) | 1 month | Flash freeze on tray, then wrap individually |
| Cherry topping (separate) | 1 week refrigerated | Store in glass jar, stir before using |
When preparing the filling for your cherry cheesecake recipe, ensure all ingredients are at room temperature.
Reheating Note: Cheesecake is best served cold. If frozen, thaw in refrigerator for 12 hours before serving. Never microwave, as it ruins the texture.
Flavor Variations
Spicy Twist
Give your cherry cheesecake unexpected warmth by adding ½ teaspoon ground cinnamon and ¼ teaspoon ground cardamom to the filling. For the topping, simmer fresh cherries with a pinch of cayenne pepper and a cinnamon stick for a sophisticated sweet-heat combination that pairs beautifully with the cool, creamy filling.
Keto/Paleo Adaptation
This cherry cheesecake recipe is the ultimate expression of your baking skills.
Replace graham cracker crust with a mixture of 2 cups almond flour, ¼ cup melted coconut oil, and 2 tablespoons erythritol. Use erythritol or monk fruit sweetener instead of sugar (same measurements). For the topping, make a fresh cherry compote sweetened with stevia. The texture will be slightly less firm but equally delicious. Calories reduce to approximately 295 per slice.
Global Flavors
Italian Ricotta Blend: Replace 8 oz of cream cheese with whole milk ricotta for a lighter, slightly grainy texture reminiscent of Italian cheesecakes. Add 1 tablespoon amaretto liqueur and ½ teaspoon almond extract.
Japanese Matcha Cherry: Add 2 tablespoons culinary-grade matcha powder to the filling for a vibrant green color and earthy flavor that complements tart cherries beautifully.
This cherry cheesecake recipe will guide you to avoid common pitfalls.
French Lavender: Steep 1 tablespoon culinary lavender in the heavy cream (warm and strain before adding). The floral notes create an elegant, sophisticated flavor profile.
Serving Suggestions
Perfect Pairings:
Serve slices with a dollop of freshly whipped cream and a few fresh cherries on the side. The cheesecake is rich, so light accompaniments work best. Consider a small scoop of vanilla bean ice cream for special occasions, or a drizzle of dark chocolate sauce for chocolate lovers.
Side Dishes:
- Fresh berry salad with mint
- Espresso or strong coffee to cut the richness
- Sparkling water with lemon
- Light butter cookies for textural contrast
Wine & Beverage Pairings:
- Sweet Riesling – The wine’s acidity balances the creamy richness
- Ruby Port – Cherry and port are classic companions
- Champagne or Prosecco – Bubbles cleanse the palate between bites
- Dessert coffee – Irish coffee or a simple espresso
- Black tea – Earl Grey’s bergamot complements cherries beautifully
With the cherry cheesecake recipe, you can create memories that last.
FAQs
Can I use frozen cherries instead of canned pie filling?
Absolutely! Thaw 3 cups of frozen sweet or tart cherries, then simmer with ½ cup sugar, 2 tablespoons cornstarch, and ¼ cup water until thickened (about 10 minutes). Add 1 tablespoon lemon juice and ½ teaspoon almond extract. Cool completely before topping the cheesecake. This gives you more control over sweetness and creates a fresher flavor.
How do I fix a cracked cheesecake?
Good news – cracks are purely cosmetic! Cover them with the cherry topping, whipped cream, or sour cream topping (mix 2 cups sour cream with ¼ cup sugar and 1 teaspoon vanilla, spread on cooled cheesecake, bake 5 minutes at 350°F). For future prevention, use the water bath method and avoid overbaking.
Is this cherry cheesecake recipe safe during pregnancy?
Yes, because all eggs are fully cooked during baking. The internal temperature reaches 150°F, well above the 160°F needed to eliminate salmonella risk. However, pregnant women should avoid the no-bake version unless using pasteurized eggs, as the gelatin method doesn’t cook the eggs. Always consult your healthcare provider with specific dietary questions.
Why did my cheesecake sink in the middle?
Adding unique flavors to your cherry cheesecake recipe can elevate it even further.
Sinking happens from sudden temperature changes or overbaking. The gradual cooling method (1 hour in oven with door cracked, then room temperature cooling) prevents this. Also, don’t overbake – the center should still jiggle when done. It firms up during cooling.
This cherry cheesecake recipe will help you create an irresistible dessert.
Can I make this without a springform pan?
While possible, it’s challenging. You could use a regular 9-inch cake pan lined with parchment paper with long overhangs to lift it out, but removing slices cleanly is difficult. A springform pan is a worthy investment for cheesecake making – they cost $15-30 and last for years.
How far in advance can I make this?
Cherry cheesecake actually improves with time as flavors meld. Make the cheesecake up to 2 days ahead and refrigerate without the topping. Add cherry topping 2-4 hours before serving for the best appearance and texture. This makes it ideal for holiday and party planning.
Conclusion
Now you’re equipped with three revolutionary methods for creating the perfect cherry cheesecake – from the traditional water bath technique that guarantees crack-free results, to the dense New York-style method, to the convenient no-bake option for summer entertaining. Each method produces a spectacular dessert that’ll have friends and family begging for the recipe.
Join over 12,000 home bakers who’ve mastered this cherry cheesecake recipe and transformed their dessert repertoire! After you’ve conquered this classic, try our [Ultimate Strawberry Shortcake Guide] or [Professional Chocolate Lava Cake Tutorial] to expand your baking skills even further.
Join over 12,000 home bakers who’ve mastered this cherry cheesecake recipe and transformed their dessert repertoire! After you’ve conquered this classic, try our [Ultimate Strawberry Shortcake Guide] or [Professional Chocolate Lava Cake Tutorial] to expand your baking skills even further.
Follow this cherry cheesecake recipe for a dessert that impresses every time.
With the cherry cheesecake recipe, you can create a stunning dessert that is sure to wow.
Join bakers who have perfected their skills using this cherry cheesecake recipe.
Finally, enjoy the satisfaction of mastering this cherry cheesecake recipe.
After preparing the cherry cheesecake recipe, you will see how easy it can be.
Feel free to customize this cherry cheesecake recipe to suit your taste.
Explore all the possibilities with this cherry cheesecake recipe!
Bring joy to your gatherings with this cherry cheesecake recipe.
You’ll be proud to share this cherry cheesecake recipe with friends and family!
We hope you enjoy our cherry cheesecake recipe as much as we do!
This cherry cheesecake recipe allows you to experiment with flavors and textures.

Cherry Cheesecake Recipe: 3 Revolutionary Methods You Need To Know
Ingredients
For the Crust:
- 2 cups graham cracker crumbs ((about 16 crackers))
- ½ cup ½ cup unsalted butter (melted (1 stick))
- ¼ cup granulated sugar
For the Filling:
- 32 oz cream cheese, room temperature ( (4 packages, 8 oz each))
- 1¼ cups granulated sugar
- 3 tablespoons all-purpose flour
- ¼ teaspoon fine salt
- 4 large eggs, room temperature
- 2 egg yolks, room temperature
- ⅔ cup sour cream
- ⅓ cup heavy cream
- 2 teaspoons vanilla extract
- 1 teaspoon lemon zest ( (optional))
For the Cherry Topping:
- 21 oz cherry pie filling (or homemade) ( (or homemade))
- 1 tablespoon fresh lemon juice
Instructions
Prepare the Crust:
- Preheat oven to 350°F.
- Mix graham cracker crumbs, melted butter, and ¼ cup sugar until combined.
- Press mixture firmly into bottom and 1 inch up sides of 9-inch springform pan.
- Bake for 10 minutes until golden. Cool completely.
- Make the Filling: 5. Lower oven temperature to 325°F (for water bath method). 6. Beat cream cheese alone for 3-4 minutes until completely smooth. 7. Add 1¼ cups sugar and flour, beat for 2 minutes. 8. Add eggs and yolks one at a time on low speed, mixing just until incorporated. 9. Gently fold in sour cream, heavy cream, vanilla, and lemon zest.
Bake Using Your Chosen Method:
- Method 1 – Water Bath (Recommended): 10. Wrap springform pan in two layers of heavy-duty foil. 11. Place in roasting pan and pour hot water halfway up sides. 12. Bake at 325°F for 60-70 minutes until edges set but center jiggles.
- Method 2 – New York Style: 10. Bake at 475°F for 15 minutes. 11. Reduce to 200°F and bake 60 more minutes without opening door.
- Method 3 – No-Bake: 10. Add 2 teaspoons gelatin (dissolved in 3 tbsp water) to filling. 11. Replace heavy cream with additional sour cream (1 cup total). 12. Pour over chilled crust and refrigerate 6 hours.
- Cool and Finish: 13. Turn off oven, crack door, cool in oven for 1 hour (baked methods). 14. Remove and cool to room temperature. 15. Refrigerate 4-6 hours or overnight. 16. Top with cherry filling before serving.
Notes
- All ingredients must be at room temperature for smooth texture
- Don’t overmix after adding eggs – this causes cracks
- Center should jiggle slightly when done – it firms while cooling
- Cheesecake can be made 2 days ahead without topping
- Store covered in refrigerator up to 7 days
- Freeze without topping for up to 3 months
- For best results, use full-fat cream cheese blocks, not spreadable
- Cherry topping can be made with fresh, frozen, or canned cherries